Wednesday, July 30, 2008

More H2O and Techno Stamper #28


Here is this weeks Techno Stamper Sketch. You can play along too here http://technostamper.blogspot.com . You really should try these sketch challenges. They really make you think. I used another piece of my H2O technique I tried over the week end. Not sure I'm finished with this card yet. I'm not thrilled with the background but here it is until I have time to play with it a little more. Now I'm off to work.

H2O surprise

Over the week end I found out I would start teaching at a Stamp Store an hour from me. Excitement Excitement. So I went to work coming up with my first class. I started looking through my techniques for 3 that were easy but used different supplies. I came across this one which uses H2Os. It glimmers so much. A really gorgeous background. I took the pictures under a light to help show you the shine. They are both made the same but with one difference. My secret. Not sure which one I like more. I've never really liked the look of an image colored with H2Os but this background is awesome and will be one I use more often. Well I decided not to use this technique for my class. Atleast not this class (**hint hint**). The first card uses a frog from I Brake for Stamps. The second card uses a little sea horse I got at a used stamp sale and has no markings. I also used the sketch this week from http://cardoftheweek.ning.com to make this card.


Saturday, July 26, 2008

So much excitement- new techniques

Last night just before I shut the computer down I checked my email one last time. There was the announcement. YEAH!! The new TJ techniques were on line. Going to bed would have to wait. I skim through them looking for something of interest and there it was. Oh I am so excited. How am I going to fall asleep. I will dream all night about trying this technique out. The technique is called Bandana. I think it is my NEW favorite technique. Is this not cool!!!!!!. I've been working on them all afternoon. So much fun!! Here are 2 I finished. The yellow card has a stamp from I Brake for Stamps- The Stamp in Back line and the blue card uses Stamps from Su. And now I'm going back to play some more but I had to share.

Thursday, July 24, 2008

Techno Stamper Sketch # 27

I have been working on this sketch for 3 days. Remember I limit myself to what I have in a basket. I just couldn't find the right image to divide. Couldn't match any rectangle colors with a background and the image. Finally I think I have found the right combination. And antiquing the squares really helped it out. It was just a little to plain for me so I added the metal leaf. The sentiment is from I Brake for Stamps and the Tree is from SU. You can play along with the Techno Stampers Sketch Challenges by visiting
Mary Jo at http://technostamper.blogspot.com/.


Wednesday, July 23, 2008

ATCs, Inchies and MOOOOOO Cards

Moo Cards. I love that. Just heard of them last week and tried to find out why the Moo. Thinking it was something really cool I decided to Google it and this is what I found out. At Moo.com you can buy Business cards that are half the normal size and they are called Moo Cards. So there you have it. I'm still hoping their is a cool reason for the name. There has to be. But until then......... My one Yahoo group is having an ATC conversation. I have been making them for years. Have even belonged to a few ATC groups. Some are Artsy and some aren't. Some are for Trading and some are for Card making. Here are a few I have saved that were sent to me.


Sometimes when you are trying to make a card the size is a problem. You can't pull together an idea because you are so busy trying to fill the space. Here is an idea for you to try. This is an example of an Inchie, a Moo Card and an ATC.


Let's start with the ATC. You take a 2 1/2 x 3 1/2 bottom layer and create from there. Of course you need a stamp that will fit the space. It could be an image or a saying. Add a few more layers and it becomes a card front.


The Moo Card is 1 1/8 x 2 3/4. This was my first one. I will explore this some more. Add a layer and some embellishments. It becomes the focal point.


Some times with just the right background all you need is an Inchie.


Try starting smaller and see what you can create.

Tuesday, July 22, 2008

Once again we come to those pesky 2 days that interrupt my summer vacation. Atleast I only have to work till 2:30 today. I hope to get my last sketch done when I get home but for right now here is the one I made last night. This Sketch is from
http://cardoftheweek.ning.com/. The sunflower is not mine. It actually belongs to Molly B. who sent it to me in a swap. It once was a tag but I have cut it down to fit the sketch. Loved the sunflower so had to use it.


Monday, July 21, 2008

A Sketch and another square card

It's Monday and it's time for the sketches to come out. I just finished the Mojo Monday #47 sketch from Poeticartistry.blogspot.com. Used some of my Glimmering Waves I just made and a pop up butterfly. She was feeling rounded this week with the sketch. It's a nice change from the normal rectangular shape. The second card is another sample from my previous post. This time though I only used one square behind my image. Added a strip at the bottom the same color as the square. A photo corner for some extra color, pearls and lots of white dots made with my Inkssential pen. I'm beginning to enjoy making all those dots.


Let's make a Square card

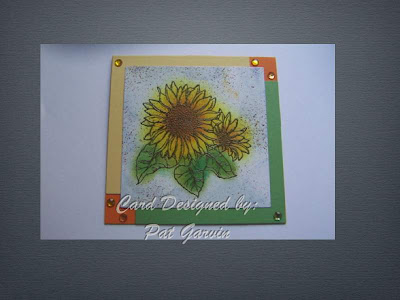
My friend Nancy said to me to make something to show her now that I have subscribers. So for my first tutorial we're going to make a square card with a super quick background.


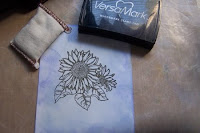
I'm also going to show you an easy way to color images in on glossy card stock. So to get started you need to cut your 8 1/2 x 11" sheet of card stock at 4 1/4 instead of your usual 5 1/2. Fold it in half and set aside. These are the supplies you will need.


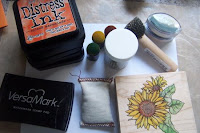
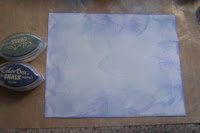
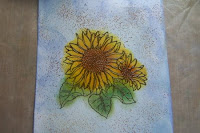
Take a piece of glossy card stock and 2 colors of chalk ink. Rub the lightest color all over the card stock. Just take the pad and drag it across. Then take the darker color and go around the edges and in towards the center a little. You want the center light.


Rub your embossing buddy all over the piece. Stamp your image with Versa Mark and sprinkle with embossing powder. I used Pirates Gold by Stampendous. It's a nice gold color but it isn't a shiny gold. Shake off the excess and emboss.


Now we're ready to color in the image. I love the distressed inks and they work really well for this technique.


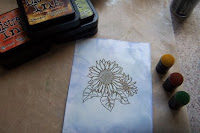
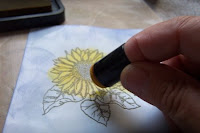
Using your finger daubers start coloring in your image. The lighter you pounce the lighter the color so you can shade without using a lot of different colors. Don't worry about going over the edges. You need a little shadow and if you get a color where you don't want it just go over it with the first color. Say I got green on my yellow. I just take the yellow and rub over the green. It will remove it.


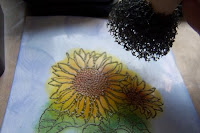
Next I took this handy dandy little tool I have had for years and never knew what to do with till I played with it one day.
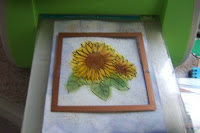
Using a brown color pounce all over the card stock. Don't have one of these little gadgets use an old tooth brush and flick the ink over the image.


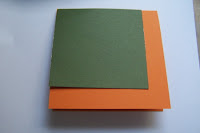
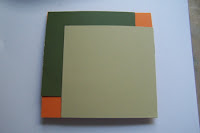
Now I used my Cuttlebug and a large Square Nestabilities to cut out my squares but you can cut them out however you want. The squares are 3 1/2" each. You will need 2 different colored card stock squares that match your image. My card is Pumpkin Pie and my 2 squares are So Saffron and Wild Wasabi. Lay one of the squares at the top of your card matching top corners. Lay the second square matching the bottom corner and your image goes on top.


Now embellish. I added some bling. I hope you liked this project. Let me know what you think and I would love to see your cards if you try it out. Don't worry about a special envelope. This card will fit right into your standard 4 3/8 x5 3/4 envelope.

Monday, July 14, 2008

New group** New Sketch Challenge

I joined a group this week end called **Card of the Week: All Things Paper Crafting **. I'm still searching through the group. Looks like a great site. They have a sketch challenge also. And I really enjoy them so ................After I finally found where it was posted this afternoon I searched through my basket to see if I could find an image for the card. I came out with this pinecone I had done some time ago with Dreamweavers paste. I chalked it and matched the chalk colors with card stock. It was just a little blah for me so I went back and came out with this Cuttlebugged strip of red. Just what it needed.


This group can be found at cardoftheweek.ning.com

Mojo Monday Week 46 sketch challenge


I was determined to get to all the blog sketches today. That was my goal this summer to do them each Monday and somewhere I just have not done it. But no more sitting back. I am doing the sketches. So here we go. My first effort ended up not fitting on my card. Make a note never ever make the circles first. But I like how it turned out. The little birds are from Inkadinkado and the sentiment is SU. The background was sprayed with Moon Glow and webbing.


Now on to the card that followed the sketch.

I chose the circles and laid them out on the card first. Smartened up on that one. Then looked for some words that would fit. Saw the Pucker up from Rubber Stamp Tapestry and right away thought of the lemon from SU. I had gotten this set at a workshop. Now was my chance to use it. Added some Stickles and Gold dots to the ribbon. Picked out this Polished Stone background. Put it all together and WOW!!! IS THIS NOT BRIGHT!! Almost need my sunglasses to look at it. Used my white Inkssentials pen and my black Glaze pen to finish it off. You to can take part in the Mojo Monday Sketch Challenges by going to poeticartistry.blogspot.com

Sunday, July 13, 2008

Still Orange

Well I went back to putting cards together after my big clean up. The first one is a wreath stamped with peg type stamps. I cut around it and added punched leaves and a cut out pumpkin. Saying is from Impression Obsession. The background is created by sponging over a mesh bag. I wasn't quite happy with it until I added the extra strip to the bottom. I think it needed the darker colors on the bottom.

This next piece I've had sitting on my desk for 2 days trying to find the right background. The Pear is the same one as the earlier post today only cut square. Layered it on Mellow Moss and So Saffron and sponged the edges. I had these 2 small pieces of Cuttlebugged card stock and layered them all together with the darkest color slanted a little. Then next was the card color and I have to tell you nothing worked for me until I pulled out some more Mellow Moss. The sentiment is from The Angel Co.

Now remember I said I loved Mooses last week. Well in my cleaning of the drawers today I came across these pinecone and moose punchies. Yes I really have a pinecone and Moose punch. I'm an outdoorsy kind of girl. The first card I really like how it turned out. The stamp is from I Brake for Stamps. I colored it with markers and stamped it once on white card stock. Chalked all around it with blue to make it look like sky and water. Then layered the part that usually gets thrown away when you punch on top. I have a habit of keeping that part. You never know. You might need it some day. Stuck a Moose in there and layered it all on a brown card. Stamped Happy Birthday on the brown pinecone. Added it to the top and I have a great Manly Birthday Card. And it went together so fast.

My last card for the day card is the same thing but with a double punched pinecone. Used a different tree. Double stamped it several times and then used a different green for contrast and stamped a few more. It needed more than the Happy Birthday pinecone so I added an embossed leaf to the top also. The background was made with a brayer and rubber bands.

I have had a full day of fun. Even the cleaning part was fun. Found some good stuff. Got rid of some stuff I will never use. And most importantly my desk is cleaned off and my Cuttlebug is sitting on the instead of being in a box under the desk. Hopefully it will be seen now and used more often. Tomorrow is another day and I expect to stamp a little more.

I'm feeling orange.


Todays cards took what seemed like forever. I fooled with paper all afternoon and then remembered the Cuttlebug. Why did it take so long. First card uses an image from Inkadinkado. Their stamps are all so nice. Well I colored in the flowers on the bird with my atyou Spica glitter pens. My newest favorite coloring supply item. Then I Cuttlebugged just half of the background. Made scor marks with my Scor pal between the embossed part and the plain part. Embossed a Nestabilities Oval. Sponged the edges with butterscotch ink. Sponged the same color on the oval. I stamped the bird then used my Nestabilities die to punch it out also. Then added white dots with my Inkssentials white pen. Finished it up with some ribbon, pearls and a paperclip. The next card uses an image from I Brake for Stamps. It's from the Time to Stamp line. I colored this one in with chalk. Added it to a Nestabilities Oval that I sponged and pierced. Pulled out a piece of my favorite background. Added a slice of Cuttlebug background and a sentiment from The Angel Company and another one is completed. YEAH!! Then I tore my stamping corner completely up and reorganized. I had grown tired of all the white plastic carts with drawers. Borrowed a piece of furniture from the spare bedroom and before you knew it I was completely moved around. Every drawer cleaned. So much happier with the way it looks now. So now I'm ready to begin stamping again.

Saturday, July 12, 2008

You can now subscribe to my Blog.

I finally figured out how to add the subscription line to my blog. OH Happy Day!! All you have to do is put in your email address and follow the instructons and it will automatically come to you. :0) You know you want to see it so sign on up.

Wednesday, July 9, 2008

Another Riley and a cute Beach card


Well Santa Moose is finished. What do you think? Isn't he cute? One more to go. Lots of Stickles and a EP I bought at Stampfest from Custer's Last Stamp called Winter Wonderland. It is at the base of the chimney. I nice smooth white with a touch of glitter. Hand cut that tiny little holly leave. Did a lot of those back in my Kindergarten aide days. I'm liking all the dots with these images. I'm getting faster at it. And am putting all the Nestabilities layers I have already cut out to use finally. I have been enjoying the last couple of days creating. I went to Target on Monday to pick up a ticket at Ticket master at the Mall for Robin and they had all this plastic type expanding file envelopes in lots of sizes for a Dollar. So had to buy a couple and came home to organize yet some more. Cleared the clutter right off my desk in a hurry. I may have to go back and get a few more. They fit my needs perfectly and the price LOL what a deal. The second card I put together this morning uses feet paper clips I got in a PIF package from one of my groups. Been trying to use them on a card but just couldn't come up with anything. VSN sent me this stamp for being published in the July Issue. Stamped it in Versa mark and then chalked it. I went from not sure about the image to loving it. Found this background in my box. I have no idea what it is but I think it is one that didn't turn out right. I throw nothing away. You never know and see it worked perfect for this card. Next I ripped a piece of beige card stock and used a EP I bought from Sparkle and Sprinkle a year or so ago and never used. It's called Beachcomber and it is in their textured line. Makes great sand on this color of card stock. Added a few tiny shells I picked up at the beach. Such tiny tiny clam shells. Perfect for these new postal rules. They barely stick up. So there you have my days creations. I must go to work sadly and will have to stop playing until tomorrow .

Tuesday, July 8, 2008

Alligator skin?? And is it time for Fall yet??


A friend told me about a technique at Stamperdog.com the other night and I couldn't resist. You know how I love techniques. Well this one was for Faux Alligator skin. It's a fun look and my little gator buddy there is liking it ALOT!. And it was simple to do. The other card is a great Fall card. Of course there is my favorite background technique in nice fall colors. All the images have been water colored and cut out and then arranged on the front of the card. I just love Fall leaves don't you?

Meet Riley


Isn't he the cutest!! You'll find him at hannastamps.com with all kinds of mounted and unmounted stamps of this cutie pie. I love Moose anyway but this one has got some real personality. I've been working all evening layering and making dots. I have a Riley Santa and a Riley sitting in a comfy chair with a cup of coffee to turn into cards yet. This is just a fun image to work with. He's had me smiling all evening. Hope he made you smile too.