Thursday, July 28, 2011
Christmas in July
This challenge gave me the excuse to get out the rubber sheet I bought about 8 months ago, cut it out and mount all the stamps. I made 2 cards this afternoon. My Christmas cards have now been started. The stamps are from I Brake for Stamps and the challenge can be found at the I Brake for Challenges blog. Both cards are sponged with Distressed inks. For the first card I cut out a circle on both my card base and my top layer. I used the circle that was cut out to stamp the little town. Placed it inside my card behind the cut out circle. The Wisemen were stamped on a scrap strip piece, partially cut out and popped up on the bottom.
The second card I embossed the Star, the Wisemen and the sentiment and then sponged the background.
Tuesday, July 26, 2011
Lets Rock and Roll
That's the challenge at GAB. I inked up my Giraffe with Memento Potters Clay. Then I rocked Memento Rich Cocoa around the edges. The background is made with the Mousse technique I showed you a few days ago.
Stamps are from Marks Finest Papers.
Monday, July 25, 2011
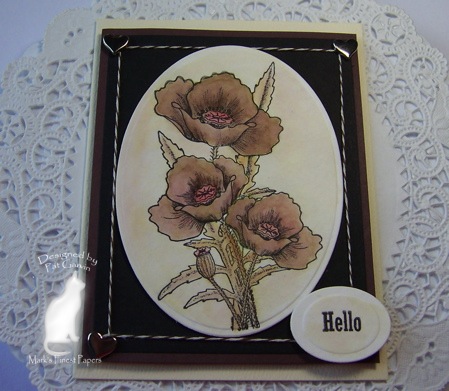
water colored poppies
This card is for the challenge at The Friends of Speedy the Cat "use 3 Hearts" and The Stampin Bs "black, brown and ivory". I stamped my image from Marks Finest Papers on water color paper and used Distressed ink in several browns and a water brush to color it in.
Wednesday, July 20, 2011
Pink, Yellow & Green
That's the challenge at the Friends of Speedy the Cat. I went through my scrap box on my desk in hopes of finding something I could use and I did.Love when that happens.
I started out wanting to use the new Lilacs of Summer from Marks Finest Papers and then decided to use the new mini set Birthday Mini. Well that didn't work for me. Couldn't make the cupcake work with the card I had assembled. I ended up using the Happy Birthday from the mini set and the Butterfly from the Lilac set.
a new use for mousse
Who thought this up? A very cool technique. This card is for the Stampin Bs Challenge "Use Bling". I've used Stickles and a black Flourish bling. It is also for the GAB Challenge use something new. Well I've never used mousse so that is my new along with the technique. I also just bought the black Flourish. And I'm using this as my first tutorial for the SSSD yahoo group new Technique Swap. Each month I will be having a tutorial with a different technique for the SSSD ladies to try out and make swap cards.I hope everyone who reads this blog will enjoy what I will be doing.
Now squirt out about a quarter size of Mousse into your hand.
Smear it all around your card stock. Covering the whole piece. Your glossy card stock may roll up. That's OK just push it down. I did 2 samples and 1 rolled and 1 didn't.
Next you will squirt your reinkers all around the mousse.
Let this sit for 10 minutes. It will foam and spread. When the 10 minutes are up heat with your heat tool until all the Mousse has disappeared. Now dab with your piece of paper towel to remove any ink and to fill in empty spots.
This is what you will end up with. Let it dry. Spray it with a sealer, I used Krylon Fixatif but whatever sealer or hair spray you have will work.
After drying cut it down to the size you want and use it for your background layer.
To color my image I used ink right from the pads and a water brush. Added a little stickles and sponged the edges of my paper.
OK ladies. I can hardly wait to see how yours turn out.
It feels so smooth and has a real satiny look. Now for the tutorial.
You will need a piece of glossy card stock ( photo paper will not work for this technique as you will be heating it ), 3 dye reinkers, Foam Hair Mousse, paper towel and a sealer.
Now squirt out about a quarter size of Mousse into your hand.
Smear it all around your card stock. Covering the whole piece. Your glossy card stock may roll up. That's OK just push it down. I did 2 samples and 1 rolled and 1 didn't.
Next you will squirt your reinkers all around the mousse.
Let this sit for 10 minutes. It will foam and spread. When the 10 minutes are up heat with your heat tool until all the Mousse has disappeared. Now dab with your piece of paper towel to remove any ink and to fill in empty spots.
This is what you will end up with. Let it dry. Spray it with a sealer, I used Krylon Fixatif but whatever sealer or hair spray you have will work.
After drying cut it down to the size you want and use it for your background layer.
To color my image I used ink right from the pads and a water brush. Added a little stickles and sponged the edges of my paper.
OK ladies. I can hardly wait to see how yours turn out.
Thursday, July 14, 2011
A couple of Summer challenges.
Nothing says summer like flowers.
This my card for the I Brake for Challenges Blog. The stamp can be found at I Brake for Stamps. I am also using this card for the challenge at Pals Paper Arts. I saw there challenge this morning and I can just see these pansies filling flower boxes on the cottage that is the inspiration this week.
Wednesday, July 13, 2011
Don't forget the sand
Make a beach scene and include sand. No problem with that. Went outside and picked some up. That was easy. I can do this Stampin Bs challenge. Now for the scene. I used a stamp from Flourishes, colored it with copics and filled the sand area in with... well with sand. The background is made with a Spellbinders Impressabilities. I dragged my Versa Mark across it and used a blue PearlX over the Versa Mark. Gave it just a little bit of a sheen and hilighted a few of the sea shells. I followed the Sketch at GAB and used Cuttlebug die cuts for my embellishments.
Subscribe to:
Posts (Atom)